Notice: A non well formed numeric value encountered in C:\ClientSites\reviewhostingasp.net\httpdocs\wp-content\plugins\crayon-syntax-highlighter\crayon_formatter.class.php on line 118
Notice: A non well formed numeric value encountered in C:\ClientSites\reviewhostingasp.net\httpdocs\wp-content\plugins\crayon-syntax-highlighter\crayon_formatter.class.php on line 119
ReviewHostingASP.NET – In this tutorial, we will show you how to display video as slideshow in your Joomla page using the combination of FlexSlider and OSYoutube. Flexslider is a jQuery plugin to create slideshows and OSYouTube is a very useful Joomla plugin that allows you to embed videos easily. By using both of these together plus template overrides, you can create a video slideshow.
How To Display Video as Slideshow in Joomla Page?
So, let’s begin!
Step 1
You can download and install OSYoutube. Just go to Alledia.com and download the OSYouTube plugin. Then install OSYoutube through Extensions > Manage > Upload and Install.
Step 2
First, let’s create a category for your video content. In this example, we’re going to call it “Videos”. Just go to Content > Categories then Add new category.
After that, let’s create articles assigned to the new category. Just go to Content > Articles > Add new article. Don’t forget to set a title. In the body, paste the URL of a YouTube video.

You have to assign the article to the new category and save it. You can create as many articles you need, each article should include a single video.
Step 3
Now, we have to create the template override. Go to Extensions > Template manager > Templates. Choose “Create overrides” tab. Then, click mod_articles_news.
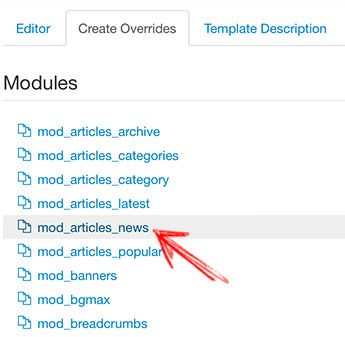
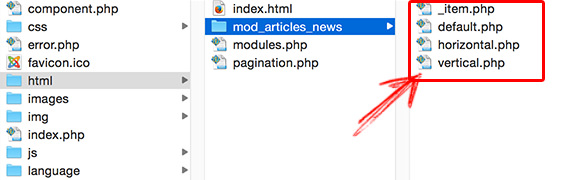
This will create a set of files in /templates/yourtemplate/html/mod_articles_news/
Step 4
In this step we will integrate Flexslider 2. Follow this steps:
- Download Flexslider from the developer’s page
- Decompress the zip file
- Look for the jquery.flexslider-min.js file and move that inside your /templates/yourtemplate/js/ folder
- Look for the flexslider.css file and move that inside your templates/yourtemplate/css/ folder
- Look for the fonts folder and move that inside your templates/yourtemplate/css/ folder
Step 5
Now, you can customize the override. Create a new PHP file named slideshow.php. Then, Save it inside templates/yourtemplate/html/mod_articles_news/.

After that, add this following code:
1 2 3 4 5 6 7 8 9 10 11 12 13 14 15 16 17 18 19 20 21 22 23 | <?php defined('_JEXEC') or die; $app = JFactory::getApplication(); JHtml::_('stylesheet', 'templates/' . $app->getTemplate() . '/css/flexslider.css'); JHtml::_('script', 'templates/' . $app->getTemplate() . '/js/jquery.flexslider-min.js'); ?> <div class="newsflash flexslider <?php echo $moduleclass_sfx; ?>"> <ul class="slides"> <?php foreach ($list as $item) : ?> <li><?php require JModuleHelper::getLayoutPath('mod_articles_news', '_item'); ?></li> <?php endforeach; ?> </ul> </div> <script type="text/javascript"> jQuery(document).ready(function(){ jQuery('.flexslider').flexslider({ animation: "slide", slideshow: false }); }); </script> |
1 2 | JHtml::_('stylesheet', 'templates/' . $app->getTemplate() . '/css/flexslider.css'); JHtml::_('script', 'templates/' . $app->getTemplate() . '/js/jquery.flexslider-min.js'); |
1 2 3 4 5 6 7 8 | <script type="text/javascript"> jQuery(document).ready(function(){ jQuery('.flexslider').flexslider({ animation: "slide", slideshow: false }); }); </script> |
1 2 | JHtml::_('script', 'media/jui/js/jquery.min.js'); JHtml::_('script', 'media/jui/js/jquery-noconflict.js'); |
Step 6
It’s time to create a Newsflash module. Go to Extensions > Module manager > New. Choose Articles – Newsflash. And then select the category. After that go to In Advanced > Alternative layout choose slideshow.
You can set the parameters as in the screenshot below:
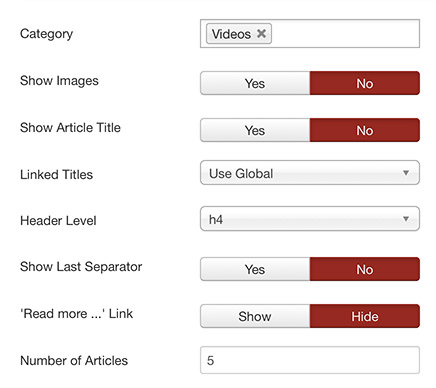
Don’t forget to save it.
Step 7
It’s done! Go to the front of your site to check out how it looks, the content will update automatically thanks to the Newsflash module:

Best and Recommended Joomla Hosting
We highly recommend you to HostForLIFE.eu, the leader of Windows and ASP.NET hosting provider in Europe. Their service is ranked the highest top #1 spot in several European countries, such as: Germany, Italy, Netherlands, France, Belgium, United Kingdom, Sweden, Finland, Switzerland and many top European countries. HostForLIFE.eu is the only solution that helps everyone from professional developers to large enterprises achieve success in Joomla application lifecycle management. Their advanced web hosting service includes blazing-fast business class hardware, the powerful security of suPHP, and excellent costumer support. With their painless one-click install, your joomla website will be up and running in no time.